
Rainwater Harvesting Systems That Work in Any Climate (2026 Update)
In-depth 2026 guide to reliable rainwater harvesting for off-grid living: components, step-by-step setup, costs, maintenance, pitfalls, and top gear picks (Berkey, UV, tanks, pumps). Practical advice for any climate.
WATER SYSTEMS
Live Off The Grid Contributor
4 min read
I've been collecting rainwater for years now, and let me tell you — nothing beats the feeling of turning on the tap and knowing the water came straight from the sky, filtered by your own setup, with zero utility bill attached. Whether you're running a full off-grid homestead, prepping for uncertain times, or just want to cut your water costs and live more independently, a solid rainwater harvesting system is one of the smartest moves you can make.
The beauty of rainwater is it's free, abundant in most places, and naturally soft (low minerals means less scaling in pipes and appliances). But here's the catch: raw rainwater picks up dust, pollen, bird droppings, leaves, and atmospheric pollutants as it hits your roof and runs into gutters. Without proper collection, storage, and treatment, it can turn into a sludgy mess or worse — harbor bacteria.
In 2026, the gear has gotten better, cheaper, and more reliable. Materials like food-grade polyethylene tanks last decades with minimal upkeep, first-flush diverters are smarter, and filtration/purification options range from gravity-fed beasts to low-power UV systems that run off solar. I've tested a bunch, talked to dozens of other off-gridders, and read through every forum thread and real-world review I could find.
This guide breaks down everything you need to know to build a rainwater harvesting system that actually works — reliably, year-round, in any climate. We'll cover components, best setups for different needs, costs, maintenance, common mistakes, and my top recommendations (with affiliate links where I earn a small commission at no extra cost to you — only stuff I'd install myself).
Why Rainwater Harvesting for Off-Grid Living?
First, let's talk basics. A good system can supply 100% of your household water if sized right — drinking, cooking, showers, laundry, garden irrigation. Average person uses 50-100 gallons per day; family of four needs 200-400+ gallons daily. With a decent roof and average rainfall, you can collect thousands of gallons annually.
Key advantages:
- Independence — no well drilling (which can cost $10k-30k+), no municipal hookups.
- Cost savings — after initial setup, water is free.
- Eco-friendly — reduces runoff pollution, eases strain on aquifers.
- Reliability — even in droughts, stored water buffers you; pair with solar pumps for power-free operation.
Downsides? Initial cost, maintenance required, and you need enough rainfall (at least 20-30 inches/year for serious supply, though even drier areas can supplement).
Core Components of a Reliable Rainwater Harvesting System
A complete system has these main parts:
1. Catchment Area (Roof)
Metal roofs (galvanized steel, aluminum) are best — smooth, low contamination, durable. Asphalt shingles work but leach more particles; avoid treated wood or old lead-painted roofs.
2. Gutters & Downspouts
Seamless aluminum gutters (5-6 inch) minimize leaks. Add leaf guards/screens to block debris.
3. First-Flush Diverter
Critical for quality. Diverts the first dirty runoff (bird poop, dust) away from your tank. Simple PVC designs or commercial ones like RainHarvesting or Clean Rain.
4. Pre-Filtration / Leaf Eater
Downspout filters (e.g., RainFlo or Oatey) remove leaves/twigs before water enters diverter.
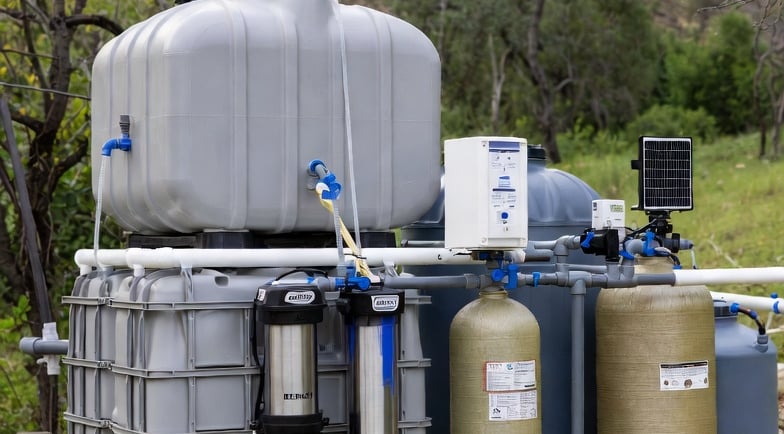
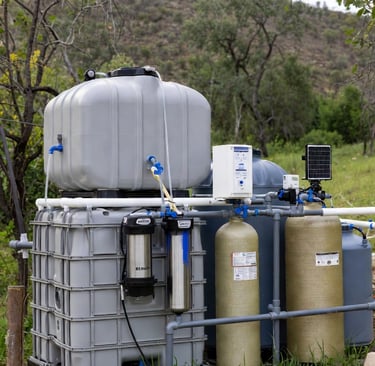
5. Storage Tanks / Cisterns
Above-ground (polyethylene barrels/tanks) — cheap, easy install.
Underground cisterns (poly or concrete) — better insulation, aesthetics, freeze protection.
Sizes: Start with 1,000-5,000 gallons; full off-grid often 10,000+.
6. Inlet & Overflow
Calming inlet prevents stirring sediment; overflow pipe directs excess safely.
7. Pumps & Distribution
Gravity-fed for non-potable; submersible or booster pumps (12V solar-powered) for pressure.
8. Filtration & Purification
Multi-stage: sediment → carbon → UV/RO/Berkey for potable.
Step-by-Step: Building Your System
Step 1: Calculate Your Needs & Collection Potential
Roof area (sq ft) × annual rainfall (inches) × 0.623 = gallons/year potential.
Example: 2,000 sq ft roof, 40 inches rain = ~50,000 gallons/year.
Subtract 20-30% losses (evaporation, first flush). Plan storage for your dry season (2-6 months supply).
Step 2: Design Layout
Dry system: Gutters → diverter → tank (simpler, cheaper).
Wet system: Underground pipes to tank (more efficient, cleaner).
Step 3: Install Catchment & Conveyance
Clean gutters thoroughly. Install screens. Add first-flush (DIY PVC or buy one — highly recommended).
Step 4: Choose & Install Storage
For 1,000-gallon starter: Poly tank ~$800-1,200.
Larger 5,000-gal underground ~$3,000-6,000 installed.
Step 5: Add Treatment
Non-potable (garden/toilet): Basic sediment filter.
Potable: Sediment (5-20 micron) → activated carbon → UV sterilizer or gravity purifier like Big Berkey.
Step 6: Pump & Plumbing
12V solar pump for pressure; gravity for simple.
Best Rainwater Harvesting Systems & Components (2026 Recommendations)
Here are my top picks based on durability, performance, and value.
Best Overall System for Beginners/Moderate Use
- RainFlo or BlueBarrel DIY Kit — Complete with diverter, first-flush, tanks. Great for 500-2,000 gal setups.
Pros: Modular, easy expand, solid community support.
Cost: $1,500-4,000.
(We do not have a link yet, but are working on it)
Best Value Storage Tanks
- Norwesco or Bushman Polyethylene Tanks — Food-grade, UV-resistant, 1,000-5,000 gal.
Pros: Affordable ($0.50-1/gal), lightweight, long life.
Cons: Above-ground needs freeze protection.
Best First-Flush Diverters
- Clean Rain Advanced or RainHarvesting Pty — Self-cleaning, high flow.
Pros: Removes 90%+ initial contaminants automatically.
(Buy Here)
Best Filtration/Purification
- Big Berkey or Royal Berkey — Gravity-fed, no power, removes bacteria/viruses/heavy metals.
Pros: Proven for off-grid, lasts years.
Cons: Slower flow (fill overnight).
- UV Systems (Acuva ArrowMAX or similar 12V) — Kills pathogens fast, solar-compatible.
Pros: Instant, chemical-free.
- Multi-Stage Inline (sediment + carbon + UV) for whole-house.
Best Pumps
- Shurflo or Dankoff 12V Solar Pumps — Low power, reliable for cistern draw. (LINK)
Real Costs Breakdown (2026 Prices)
- Basic rain barrels (55-100 gal × 4): $500-1,200
- 1,000-gal poly tank + diverter + basic filter: $1,500-3,000
- Full off-grid potable system (5,000 gal underground, multi-stage treatment, solar pump): $8,000-15,000+
- Maintenance: $500-1,000/year (filters, cleaning)
ROI: In 5-10 years, you recoup costs vs municipal/well expenses.
Maintenance Tips from Years of Use
- Clean gutters/screens 2-4×/year.
- Flush first-flush after storms.
- Inspect tank for algae (dark cover helps).
- Replace filters per schedule.
- Test water yearly (bacteria, pH).
- Winterize: Drain lines if freezing.
Common Mistakes to Avoid
- Skipping first-flush — biggest quality killer.
- Undersized storage — run dry in summer.
- Poor roof choice — avoid contaminated surfaces.
- No overflow plan — flooding.
- Ignoring local regs — most states allow, but check (e.g., Colorado/Utah limits).
Final Thoughts
A rainwater harvesting system isn't just gear — it's freedom. Start small with barrels for garden, scale to cisterns for home use. With good design, it'll serve you reliably for decades.
If you're in a wet climate, go big; drier areas, combine with well/spring. Questions on your setup? Drop them below — I've helped folks tweak systems from tiny cabins to full homesteads.
Stay self-reliant out there.